
To see if this custom-fit item will work for you please tell us what vehicle you'll use it with.


Custom designed to fit your vehicle so it can be safely towed behind your RV, this base plate has easily removable arms that offer a seamless look when you're not flat towing. Base plate bolts directly to your chassis, so no welding is required.
Features:
Specs:
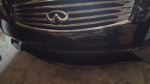
This base plate's hidden design creates a clean and seamless look. The bracket arms are easily removable, creating a slick appearance when you're not flat towing. Because the arms can be removed, you also won't have to worry about banging your leg into any protruding arms when you walk by.
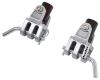
Attaching and removing the bracket arms is a breeze. To attach the arms to the base plate, simply insert them into the receivers and rotate them until they lock into place. Once you're finished towing and want to remove the arms, pull the pin to disengage the lock, rotate the arms, and remove them from the receivers. Finally, plug up the now empty receivers with the included receiver covers to help keep dirt and debris out of the base plate and provide a finished look.
Flat towing your vehicle is much more convenient than using a trailer or a tow dolly. These other options take up much more storage space, leaving you less room both at home and at the campsite. In addition, securing your vehicle to a trailer or tow dolly can be a hassle and more time consuming than hooking up with a tow bar.
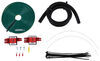
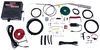
There are 5 basic components needed when flat towing a vehicle: a tow bar, a base plate kit, a safety cable set, tow bar wiring, and a supplemental braking system.
The tow bar links your towed car to your motorhome. It attaches to the custom-fit base plates that install on the frame of your towed car. Safety cables ensure that your towed car does not separate from your motorhome in the event that your tow bar becomes detached. Tow bar wiring allows your towed vehicle's signal lights to sync up with your motorhome's tail lights, which is required by law in most states. Finally, the supplemental braking system - also required in most states - brakes your towed car when the brakes in your motorhome are activated, preventing wear on the motorhome and decreasing braking distance for your entire setup.

California residents: click here
Videos are provided as a guide only. Refer to manufacturer installation instructions and specs for complete information.
Clayton: Hey guys, Clayton here at etrailer.com. Today, we'll be taking a look at, and I'll show you how to install, a Blue Ox base plate on our 2009 Infiniti G37. Now there are six main components when we're flat towing a vehicle. We need our base plate, our tow bar, our wiring, our braking system, our safety chains, and our brake light relay. So our base plate is going to allow us to tow our Infinity here behind our RV. So a base plate is a steel construction.
It's finished in a nice black powder coat finish. It's going to resist any rust or corrosion over time. This component here is a removable arm. It's very easy to take out. You simply pull this, twist it over, then we can slide our arm out.
And as you can see, it's going to tuck behind our fascia here, which makes a nice clean look when we're not flat towing our vehicle. And then when we re-install it, push it in like that, pull our tab over, and then it'll snap into place and you're ready to go.So this is where our tow bar is going to connect. All we do is pull our tow bar out, slide it into place, take our pin, slide it through, and make sure to put our safety on there. And then you're good to go. This is a Blue Ox tow bar.
This plate here is for our safety chains. Our safety chains are designed if our arms fail that our vehicle will not just disappear down the road. We're going to hook our safety chains up in a crisscross pattern underneath our vehicle. We'll take those and snap them in right here. Our tow bar is going to mount right up to the chassis of our vehicle.
This is going to give us a nice sturdy connection point for our tow bar when we're flat towing our vehicle. In terms of installation, getting our base plate on really isn't that bad. We do have to remove our fascia, drill some holes and trim some plastic, but overall it's pretty straight forward.Speaking of installation, I'll show you how to get this installed now. To start our installation, we need to remove seven push pins right here in the front of our bumper. I'm going to use a body trim panel tool to take these out, but you can't also use a flathead screwdriver. Then under our panel here, there's going to be a 10 millimeter inaudible 00:02:09 socket. We'll take that off. This will be located on both sides. So now we're going to move underneath our vehicle. There's going to be 10 10 millimeter bolts that are going to run the length of our fascia, right on the front. We're going to remove those now. So now we're going to take off the three 10 millimeter bolts right here. Those will be on both sides. So you want to repeat the same process on either side. So now we're going to remove a push pin fastener and our wheel well. It's going to be the one right here, down towards the front, in front of our tire, in you use a body trim panel tool to get that push pin off. We repeat that process on the other side.Our next step is going to be to remove a 10 millimeter bolt inside of our fender liner. So I'm going to take a plastic FRY tool, pull back our fender liner, and take out that 10 millimeter bolt. With that bolt removed you repeat the same process on the passenger side. And then just a good thing I like to do is add a little bit of painter's tape on our body line here. And I'll follow that line up here. That's just going to protect our paint when we take the fascia off. That way if it shifts, it doesn't scratch. Then you're going to add tape on your fascia side too, just for a little extra protection. Now that our body edge is taped, we now remove our fascia. I would suggest to start from the outside and work towards the middle. Once you get towards the middle, it's good to grab an extra set of hands, just so we don't drop our bumper.Then as you're pulling off your fascia, you want to make sure if you have fog lights or any sort of wiring, you don't just pull the bumper off because you'll rip that wiring out. So you want to get the bumper loosely taken off and then you can unplug your connections. As we we're taking off our fascia, we realized there was another 10 millimeter bolt that was not mentioned in our instructions. It's located right here. So we'll take that off on both sides and then our fascia will come down. With the other two bolts removed, we can now remove this part of our fascia. With the last part of our fascia removed, we can lift our fascia out of place. This model doesn't have any fog lights, so we're good. We can set this off to the side without scratching our paint.Next thing we take off our foam that covers our bumper. This will simply just pull out and this will expose our bolts for our bumper beam. So next we remove our bumper beam bolts, they're going to be 12 millimeters. There will be four on each side. Then before we remove the rest of our bolts on our bumper beam, we want to make sure to unsnap any wiring that's going to be connected to it, just in case that bumper beam falls off we don't rip our wiring. With all of our hardware disconnected from our bumper beam, we can now set it off to the side and go onto our next step.On our driver's side, we're going to remove this plastic cover that covers our frame. You'll pull that off here. There's a couple little tabs right here that you can push down. You do that on both sides. You can pull this off with our hose and set it off to the side. Next we're going to cut this plastic cover off. We're going to follow this line right here off of our body, to this line right here. I'm going to follow that all the way back and remove that part of our cover. And for this, you can use a utility knife, pocket knife, or snips. You just want to be careful because this might move on you. Don't want to cut anything underneath it. Just follow that line and toss us some trash.Next, we're going to pop out this tab holding in our hose. Pop that out. I'll do this one down here just to give us a little bit more clearance. Since our model's a convertible, we need to remove our dampener. This will not be reinstalled. We're going to use a 14 millimeter socket on both sides. There's going to be four bolts that we're going to take off. With all of our hardware removed, we can take off our dampener. Like I said, this will not be reinstalled. So next we're going to remove this 10 millimeter bolt right here. This is the bracket that holds on our hoses. With that removed, we'll get a little bit more play out of our hoses. Next there's going to be three 10 millimeter bolts that hold on the inaudible 00:07:27. One here, then two underneath. I've already taken off the bottom two, I'll go ahead and take off the top one and let our cooler hang down. If you're taking it too far, you do want to support it because you don't want to break your hoses.Next up, we're going to cut off this tab. I've went ahead and marked it. We can use a rotary tool with a cutoff wheel. And with our tab off, we can come back and clean up this edge with a file. And now we can grab an extra set of hands, hold our base plate up into place, make sure it's fit and snug, and then we can clamp it down. With our base plate clamped into place, now we can drill out our holes. What we're doing is just take our 13 30 seconds drill bit, drill through here just a mark, then I'll come back with a smaller bit and do a pilot hole, and slowly work my way up. As long as we have these two drilled out, we're going to come to the bottom where there will be two spots for holes, and you want to use the back one. So now we need to drill out our inch and a quarter access hole for our handle nuts. I'm going to go ahead and drill a pilot hole now. We want to make sure we're using a smaller bit inaudible 00:08:46 for our hole.So now we need to drill our instrument quarter access hole for our handle nuts. You want to keep in mind where your windshield washer fluid tank is just so that when you're drilling, you're not hitting that. I'm going to go just a little bit above this bolt and that will give us plenty of room. So now we need to install our hardware. We're going to take our hex nut provided with a lock washer and some red lock tight. We're going to take a handle nut, put it through our access hole, then our bolt up inaudible 00:09:27. This can be kind of challenging, just trying to find that handle nut. Once you find it, you can start threading it. And you repeat that process for the other side. While our directions say to do this one first, I found it much easier to do the bottom, do the top, and then do the middle bolt on this side.inaudible 00:09:52 our hardware, hand tie it down. We come back and snub that down with a 14 millimeter socket. With our hardware tightened down, you want to repeat that process on our other side. So we'll come back and torque down our hardware. All of your torque specs will be listed in your instruction manual. You want to repeat this process for all the rest of our hardware. With all of our hardware torqued down, we're going to come back and cut off the rest of our handle nuts. You can use 10 snips to do this. We're going to come back and hit our hole with some clear coat. That'll just help prevent any rust from where our hole saw cut. And you'll make sure to want to do this on both sides.So I'm going to mount our ambient temperature sensor on this side, but our instructions say that there's a bracket off of the center beam, which in our case there's not. So I'm going to go ahead and run it to this factory wiring over here and make sure that it's secure. I'm just going to zip tie it for stability. You do want to make sure that the sensor is completely secure and not hanging freely. Our instructions had us move this factory wiring. I went ahead and snapped that back in to the spots, that was just so we had clearance to get our base plate in.So now we need to go ahead and remount our cooler. This is mounted with three 10 millimeter bolts. We'll go ahead and do our center middle and thread that in by hand. And we'll tighten down the rest of them. We have one 10 millimeter bolt for our hose bracket. With tied down, we can add our bumper beam. So now we can take our bumper beam, re-install, and add our 12 millimeter hardware. So I ran our safety cables up and around our frame rail back here. You want to make sure you're not coming into contact with any hoses or anything that moves underneath the vehicle. Now, once you have your ring tightened down, then go back with a 15 millimeter wrench and make sure that this is completely tight. And you want to repeat that process on the other side.So our base plate is completely installed and we'll leave our fascia off just to put on our braking system and our wiring. Then we'll want to put our fascia back on in reverse order that we took it off. But keep in mind, we're going to have to trim out our fascia for our attachment points. All right, now we're going to want to grab an extra set of hands, hold our fascia up into place, and check where we're going to need to trim it. So all of our components fall in this mesh material here. So we'll just kind of eyeball it and figure out where it's going to fall and then we'll come in and trim it out. So that's going to do it for a look at an installation of our Blue Ox base plate on our 2009 Infiniti G37..


Prompt service!
Great service
Fast shipping, good price, good product, easy install.
Delivered promptly!
Got package as told
Do you have a question about this Tow Bar Base Plate?
Info for this part was:
At etrailer we provide the best information available about the products we sell. We take the quality of our information seriously so that you can get the right part the first time. Let us know if anything is missing or if you have any questions.


Thank you! Your comment has been submitted successfully. You should be able to view your question/comment here within a few days.
Error submitting comment. Please try again momentarily.